Monday, October 12, 2015

Thannirsaar @ Moringa Leaves with Dhall

Thannirsaar is a combination of using moringa leaves and cooked dhall.  The consistency is in between rasam and sambar.  In other words vegetable koothu but more soupy.  Moringa is called muringakeerai in Tamil and the pods are called drumstick or murungakai.

Moringa leaves and drumsticks are full of nutritions.  There are many articles/write-ups to attest its goodness.

Some articles that you can read about the magical
http://spinachwonders.blogspot.qa/p/if-you-have-drumstick-plant-on-your.htmlhttp://articles.mercola.com/sites/articles/archive/2015/08/24/moringa-tree-uses.aspx
http://idealbite.com/do-not-try-moringa-oleifera-until-you-read-the-facts-about-it/

I love moringa, both the leaves and the drumsticks.  .  You can make a nice drumstick rasam or or even omelette.

As these trees grow very easily in the middle east, you find them plenty around where ever you live.  I have got branches from my neighbour hanging over my side of the villa compound wall.  What a nice to way enjoy them right from the garden.  All you have to do is take a few branches enough to make your favourite dish. 

As much nutrition you get from these wonder leaves, cleaning them can be tedious, time consuming.  You need patience to remove the leaves from the stems.  Like the saying goes no pain no gain, if you want to enjoy the goodness of moringa, you have to bear the tedious session of cleaning.


Lets look at making Thannisaar

3/4 cup of toor dhall
1 tbs ginger garlic paste
3/4 tsp of turmeric powder
2-3 red chilly
1 medium sized tomato - chopped
1.5 tsp of sambar powder
1 tsp of fennel powder
1/2 tsp of cumin powder
1 cup of moringa leaves - already cleaned
1 tsp of tamarind paste, dliuted in 150ml of water
1/3 cup of milk (or coconut milk)

for seasoning
1 tsp of mustard seeds
1/2 tsp of urad dhall
a few dry chilly
a dash of hing
1 medium sized onion -chopped
A few sprigs of curry leaves

Method

  1. Wash and boil (pressure cooker) toor dhall with enough water with ginger garlic paste, turmeric powder, 2 -3 chilly, chopped tomato.
  2. Once the toor dhall is cooked, smashed it with the back of spoon, sort of congee like, add some more water and tamarind juice
  3. Add in the powders and cooked further for a few more minutes.
  4. While the dhall is being cooked, in a small pan, heat oil, once hot, add in mustard seeds, once they splutter, add in urad dhall and fry till the urad dhall is brown. 
  5. Add in hing, fry for a few seconds and add in dry chilly.
  6. Add in onions and fry till soft, add in curry leaves
  7. Pour the onions mixture into the dhall and add in 1/3 cup milk(coconut milk, if you desire)
  8. Add in moringa leaves and allow to a light boil before removing from heat.
  9. Enjoy with hot steaming rice and pappad,


Enjoy

Sathiarani

Thursday, July 2, 2015

Simple Fruit Cocktail Pudding


Simple Fruit Cocktail Pudding

I have made this pudding several times, easy and nice to taste.

Ingredients

1 big tin evaporated milk
500ml cold water
1.5 tbs of custard powder
5tbs of sugar (adjust to your taste)
a pinch of salt
1tsp of vanilla essence
1 big tin of fruit cocktail (drained the juice)

Method
Mix water, evaporated milk, sugar and salt and let it boil.
Mix custard powder mix with some water and add in custard powder mixture, let it dissolve, well and add in essence.
Let it thicken a bit.
Once done, remove from fire and allow to cool in fridge before serving
When serving, add in the fruit cocktail into the pudding and serve.


Enjoy

**Sathiarani**


Wednesday, July 1, 2015

Omelette Curry

Omelette Curry

Traditionally I am used to making egg curry with hard boiled egg.  For a change I decided to make egg curry with making omelette.  The curry itself has a tangy spicy taste. 

The curry taste after a few hours of making allowing the fully savour the taste.  You can make the curry a day ahead and proceed with the omelette in the morning.

Lets look at Omelette Curry

Ingredients.

Curry Base

1 big sized onion
1 medium sized tomato
thumb sized ginger
2 sprigs of curry leaves
4-5 green chilly
1 tsp of fenugreeks
1/2 tsp of cumin seeds
1/2 tsp of fennel seeds
a small fist size tamarind
750ml of water
1/4 cup of milk
2tbs of chilly powder
2tbs of fish curry powder
1tsp of garam masala
1/2tsp of turmeric powder
5 sprigs of coriander leaves - chopped coarsely
salt to taste


Omelette
3 egg
1 medium sized onion - chopped finely
4-5 chilly - chopped finely, chilly according to your preference
2 tbs of finely chopped coriander leaves
salt to taste

Method

For making curry :
  1. Soak tamarind in water so loosen the pulp.  Squeezed the pulp and strained the tamarind.
  2. Blend tomato and ginger into a fine paste.
  3. Make a paste from all the powders.
  4. In a pan, heat fenugreek seeds, fry for a few seconds, and add in cumin seeds and fennel seeds
  5. Add in the onions, sauté till soft, add in curry leaves and chilly, fry for a few more seconds.
  6. Add in the blended tomato puree, sauté for a few more minutes. 
  7. Add in the curry paste, mix well with the tomato puree and onions, fry till you seed the oil starts to split. 
  8. Add in tamarind juice, mix well and add salt to taste. 
  9. Cover the pot, put fire on high and let it boil till you get the curry reduced to a desired thickness. 
  10. Reduced the fire to Add in the milk, let the it boil slowly and add the omelette and let it simmer for a few more minutes.
  11. Removed from fire and add in the coriander leaves.

For making omelette:
  1. Chopped onions, green chilly and coriander leaves finely.
  2. Whish egg well with salt.
  3. Heat a pan with some oil and once it is hot, sauté onion and green chilly a few minutes till soft.
  4. Pour the sauté onion into the whisked egg, together with the chopped coriander leaves, give a good mix.
  5. Divide into portion to make omelette.
  6. Cut the omelette into desired size and into the curry.


And your are ready for a nice tangy and spicy omelette curry.  Good for rice and rotis/chapatis.  

Enjoy

**Sathiarani**


Monday, May 18, 2015

Cabbage Kootu

Cabbage Kootu

If you want something quick and easy to prepare - a 2 in 1 dish combining dhall and vegetable.  You can use any

Ingredients that you require
1/2 cup of toor dhall/split moong dhall
1 tsp of ginger garlic paste
1 medium sized tomato - quartered
1/2 tsp of turmeric for boiling dhall + 1/2tsp for frying cabbage
4-5 green chilly - slit into half
200 gms of shredded cabbage
1/4 cup of milk + 1/2 cup of water ( or 3/4 cup of medium thin coconut milk)
1 tsp of fennel powder
1/2 tsp of cumin powder
salt to taste
chopped coriander leaves for garnishing

For Tempering
1/2 tsp of mustard seeds
1/2 tsp of urad dhall
1/2 tsp of cumin seeds
3-4 dried chilly
1 sprig of curry leaves
a dash of asofetida
1 large onion - sliced thinly
3 tbs of oil


Method

1.  Wash and boiled the dhall with salt, ginger garlic paste, tomato, turmeric and green chilly into fine soft.

2.  In a wok, heat oil, once hot, add in mustard seeds and once splutter, add in urad dhall and cumin seeds.  Once the urad dhall turn brown, add in asofetida and chilly. Fry for a few seconds.

3.  Add in onion, salt and curry leaves and fry till the onions are soft.

4.  Add in the cabbage, turmeric and fennel powder, stir well and cook further.

5.  Once the cabbage is cooked, add in the cooked dhall, milk and water, mix well and cook till the it starts to boil.  I prefer my cabbage kootu to be not too thick or thin.

6.  Remove from fire and garnish with chopped coriander leaves.  Serve with hot rice.


Enjoy

**Sathiarani**


Coconut Cake in a Bundt

Coconut cake in a bundt.  

Soft and crunchy.


Enjoy

Sathiarani

Malaysian Style Green Bean Sweet Porridge @ Bubur Kacang Hijau

On a recent trip to a newly open supermarket, I found green bean which was split.  The first thing that came to my mind is my childhood tea time snack.

My mum used to prepare us on weekends and during school holidays many tea time snacks and one of it is Bubur Kacang Hijau.

She gets the whole green beans, dry roast over a pan till aromatic and give it a slight crush and removing the skins.

There are times she makes Ice Cream Malaysia - freezing the left overs or freshly made in long plastic case.  Sweet memories of our childhood.

This sweet porridge is so ideal especially during the hot season/summer for cooling down effect.
DSCN8270
Picture courtesy of http://adishshida.blogspot.com/2012/03/mengimbau-kenangan-ais-krim-malaysia.html


Ingredients
1 cup of green bean
200gm palm sugar - adjust according to your likeness
300ml of coconut milk - I used canned coconut milk
3 tbs of sago - soaked for 1/2 hour
a pinch of salt
1 screw pine leave (daun pandan) - either knotted or cut into 3
1/2 tsp ginger grated - optional

Method
1.  Dry roast on slow fire the green beans and crushed it slightly. Dry roasting will enhance the flavour while cooking.  You can opt out if you do not wish the to crush the beans to split it.

2.  Soak overnight or at least 6 hours (I skipped this)

3.  Boil with water, salt, ginger and screw pine leave till the beans are soft and mushy.  Add in water accordingly till beans are cooked.

4.  In a separate pot, cook/dilute palm sugar with 1 cup of water.

5.  When the beans are ready, sieve in the diluted palm sugar.  Add in sago.  Stir well.  Cook till the sago turns translucent. Stir occasionally to avoid burning.  Adjust the thickness required by adding water little at a time.

6.  Add the coconut milk.  Cook till it boils.  Adjust the sweetness and the thickness required.

7.  Serve warm or cold.


Far Left - Green Bean Popsicle & Bubur Kacang Hijau

Enjoy

Sathiarani


Saturday, May 16, 2015

The making of Basic Ground Chilly Paste

Chilly Paste

Back home, you can buy ready made chilly paste or chilly boh as it is famously known, in supermarkets. grocery shops and wet markets. It is cheap and also ready to be use in a jiff.

However, since moving to the middle east, I always made my own.  I try to make them in bulk and packaged in small bottles (used jam jars/pickles etc  that I try to save every now and then).  I keep one in the fridge and the rest in a freezer, taking it out when one bottle is done.

When you have a pre-prepared chilly paste at hand, you can always use it for any thing from sambal, to frying spicy noodles or fried rice.

The level of heat that you get all depends on the type of dried chilly used.  Some can be really really spicy and some  has no effect at all.

The use of candlenut is optional.  Candlenut is widely used in Malaysian Malay and Indonesian cuisine.  It gives a creamy sort of flavour to the dish.  Macadamia nut can be used as substitute to candlenut, however macadamia nut can be costly.

Ingredients for Basic Chilly Paste
100gm dried chilly
1 big size onion - quartered
8-10 cloves of garlic
thumb sized ginger
5-6 candlenut  (optional)  
1-2tbs of vegetable oil - I normally use olive oil                                                                                                            

Method

1.  Cut dried chilly into small pieces.
2.  Soak dried chilly in boiling water for at least 1/2 hour.
3.  Put all ingredients in food processor or blender and blend till fine paste.
4.   And the paste is ready to be used.


Happy Cooking

Sathiarani
                                

Tuesday, May 12, 2015

Instant Rava Idli

Idli or steamed indian dumplings has many variations.

When you run out of idli batter, the best is make an instant idli batter that does not require any soaking,grinding and fermentation.  It is your quick fix either for breakfast and dinner.  The idli itself is a complete meal with nuts and vegetable.  It is soft and crunchy because of cashew, goes well with coconut chutney and sambar or dhall fry.


Preparation Time : 20 mins + 5 mins resting of batter + 10 mins cooking
Quantity : 18 medium sized idlis
Serves : 3-4 person

Ingredients
2 cups of rava/semolina/suji
8 whole cashew nuts - break into small pieces
6 tbs of yogurt - whisked
3 tbs  thinly sliced carrot
2-3 green chilly- sliced finely
1 tbs sliced finely ginger
1 sprig of curry leaves - finely sliced.
Water enough to make a batter

Tempering
2 tbs of ghee
1 tsp of mustard seeds
1 tsp of urad dhall
a pinch of asofetida

Method
1.  Prepare your idly steamer

2.  Dry fry rawa.  Make sure not to burn the rava.  Keep an eye and constantly stir till slightly brown. Remove into a bowl to cool down.

3.  In the same pan, heat ghee. Roast the cashew nut till brown on low fire, remove only the roasted nuts into the rawa leaving behind the ghee.

4.  Into the hot ghee, add in mustard seeds.  Once splutter, add in urad dhall, once it turn brown and add in asofetida frying for a few seconds.

5.  Add in the chopped chilly, curry leaves and chopped ginger.  Fry for a few more minutes till aromatic.

6.  Next add in the sliced carrots and fry till the raw smell of carrot is disappears and it become soft and crumbly.  Remove from fire and add into the rawa mixture

7.  Add in the whisked yogurt and salt and mixing well .  Add in water slowly mixing at the same time.  The batter should be neither too thick nor too thin - medium consistency.


Enjoy

Sathiarani


Thursday, May 7, 2015

Chicken Hyderabadi Briyani

Late post  of Kiren's birthday lunch treat - Chicken Hyderabadi Briyani

The first time I prepared this briyani was long before I started blogging, actually when we first move to Doha.  You have to marinate the chicken and set aside for a short while.  Prepare the rice separately.  Put them together and cook and you get a nice aromatic briyani.

Typically Malaysian briyani's  comes with in a set of briyani rice, chicken/mutton/beef either as a thick gravy and side dish like raita or acar buah- @ fruit pickle

So when I was cooking this briyani, I keep thinking that I need a gravy to go with.  But you will surprise there enough gravy once you get it all done.

I cant remember whose recipe I had used previously, but this time I used Chef Sanjay Tumma of Vahrehvah.com

My portion consists of 1kg of chicken thigh drumstick part which I cut into two ending up with 12 pieces altogether.

As for the rice I used 3 cups about 480gm - it was more than enough for 3 of us for lunch.

Ingredients Required
3 cups of basmati rice or any long grain rice
1kg of chicken - cut into medium size
6 pc - peppercorn
3tbs oil/ghee
1.5 tbs of lime juice - I used lemon instead
1 tsp - coriander powder
1 tsp - cumin powder
2 bay leaves
4-6  green chilly  - slit diagonally
3-4 of cloves
3-4 of green cardamon
2 small sized cinnamon
2 large fried onion
Salt to taste
2 black cardamon - I did not use this
4-5 tbs chopped coriander leaves
1-2 tbs of mint leaves -
3-4 tbs of ginger garlic paste
2-3 pcs of mace
2.5 cups of yogurt
1tsp of tumeric
pinch of saffron soaked in 1tbs of hot water and let it dissolved


Preparation Method

1.  Put all ingredients except rice, fried onions and safron.  Set aside some coriander leaves and mint leaves for rice   Mix well and set aside to marinate.

2. Wash and soaked basmati rice for 1/2hour.  This will ensure the rice be long and fluffy..

3.  In a pot, add some oil  to the boiling water and salt to taste.  The right amount of salt will give you a good taste of the briyani,  You will it is the the right amount of salt is when you taste the water it is salty.   Add ingredients like whole cardamon, cloves and cinnamon, if desired.
Rice being cooked


4.  Add in the soaked rice into the boiling water and half cooked the rice.  To know what is half cooked rice is when the rice is boiling about 50% done.  The grain of rice is crushed but not fully cooked - that is perfect for the rice.
Strained rice before adding to marinated chicken

5.  How to cooked the briyani - In a deep, thick based bottom, lay the marinated chicken, lay evenly and spread well.  Next spread in the half cooked rice. Spread evenly.  Sprinkle the remainder coriander and mint leaves, fried onions and sprinkle the saffron liquid.  Cover the briyani tightly and cooked over medium heat for about 20 mins and the remainder 10 mins on low fire.
Rice spread over marinated chicken with the remainder fried onions and herbs


Note : This is a tip from my friend, on how to avoid the meat from the sticking to the bottom of the pan (thats what happened to me though not to much), place a tray of water over the stove and then putting over the pot in the tray - in the other word - bain marie 
The final product served with onion raita

Chicken Hyderabadi Briyani


Enjoy

** Sathiarani**


Tuesday, April 28, 2015

Kiren's 14th Birthday

Today my son turn 14.  To celebrate I made his favourite food - chicken and also chocolate cake - another of his favourite.

Lets look the cake that I made for you.  It is themed after football field.


For lunch, I made Hyderabadi Chicken Briyani.  I have done this briyani once - long before I started blogging. It turned out good.  I cant remember whose recipe I had use then, but this time I used Chef Sanjay Thumma of Vahrehvah.com.  Will post in a bit.


Enjoy

** Sathiarani **


Drum Stick Leaves Omelette

Anyone fancy drumstick leaves omelette.  Drumstick leaves or murugai keerai in tamil is a nutritious vegetable.  You can stir fry make, cooked with some dhall or even omelette.

Drumstick fruit itself you can make curry with chicken, mutton, egg curry, or dalca or simple vegetarian curry.  You can stir fry with some masala, make rasam out of its pulp (click here)

This tree grows so well here in the middle east, atleast in Qatar.  You can find everyone with land to plant will have it grown.  

Drumstick leaves


Drumstick leaves omelet

Ingredients

Eggs whisked with salt
sliced onions
chilly - sliced thinly
a handful of drumstick leaves


Preparation

Heat pan with some oil

Saute onion with chilly till soft

Add in the leaves and stir well with onions.  Try to separate the leaves so as not to get them lump in one area.

Carefully pour in the eggs mixture, cook on medium heat, cooking the bottom and carefully turn over the omelet and cook for a few more minutes till nice brown.

Serve.


** Sathiarani **


Asian InspiredTaufoo Salad

Simple and easy, no fuss salad ala Thai.  No specific measurement just go with the flow.

Ingredients

Taufoo - cut bite size and deep fry.
Sliced Onions - slight crushed with your hands
Chilly - sliced small
Carrots - Shredded
Cucumber - Sliced finely
Roasted peanuts - removed skin in whole or crushed
Roasted white sesame 
Coriander - coarsely chopped 
Sweet & Spicy Sauce

Preparations

Mix all the ingredients nicely coated with the sauce and ready to serve.


Enjoy

** Sathiarani**

Lemongrass Chicken Noodle Soup

Yesterday night's dinner - another version of chicken noodle soup with whatever that I have in the fridge.

Ingredients
300gms of chicken bones only
250gm chicken breast 
2tbs of ginger garlic paste
4-5 celery stalks - chopped coarsely
4-5 lemongrass white part only - slightly bruised
2tbs of white pepper powder
1 tbs of fish sauce
1 tbs of light soy sauce 
salt to taste

Garnishing/Side Dish
Fried Taufo
Shredded chicken pieces
Spring Onions
Coriander Leaves
Blanched broccoli and cauliflower

Preparation

1.  Boil chicken bones with water 750ml with 2 tbs of ginger/garlic paste, salt. lemongrass on medium fire about three quarter reduced

2.  Add in soy sauce, fish sauce, white pepper powder and celery and boil further for another 15 mins.

3.  Add in chicken breast and let it cook; once cooked, remove it and shred into small pieces.

4. Blanched broccoli and cauliflower in the same soup.  Remove and put it into cold water.

5.  To prepare the noodles : put vermicelli rice into cold water and put on heat till it is about cooked. Strain and run thru cold water.

To serve

In a bowl, put some noodles, shredded chicken, fried taufo, vegetables, spring onions, and coriander leaves and pour soup onto the noodles

If you wish added spiciness, chopped some green chilly and mix some soy sauce.
The condiments

Preparation of the soup

Noodles soaked to be cooked

Ready to savour

Enjoy

** Sathiarani ** 

Sunday, April 26, 2015

Deep Fried Banana Balls @ Cekodok Pisang @ Cucur Pisang

If you have over-ripe bananas what else can you do instead of cake.  Well this is what we used to have as tea time snack - Deep Fried Banana Balls.  Back home it is known as cucur pisang or cekodok pisang.

It is as easy as 1,2,3...
Step 1 : Mix all ingredients

Step 2 : Fry till golden brown

Step 3 Serve

Ingredients

4-5 over ripe bananas - any bananas will do I used the long type
1 cup of self raising flour
salt
sugar according to to your taste

Preparation

1.  Mashed the bananas well

2.  Mix all the flour, salt and sugar.

3.  Heat oil and and once it is hot, drop in dollops of mixture. I use a spoon to get almost same size balls.

4.  Fry till golden brown, remove and strain.  Make sure the oil is not too hot as it will turn brown fast but not cooked inside.

5.  Serve and enjoy.


** Sathiarani**

Saturday, April 25, 2015

Laukhi Ki Chutney @ Bottlegourd Chutney

I have got half of a laukhi/bottlegourd/soorkai which I have used the other half to make sambar.  I was planning to make idly for dinner with chicken curry and needed to make a chutney.

Remembered long back, a friend of mine ever mentioned making chutney out of the skin ridged bottlegourd.  I was tempted to make my chutney of the same but the decided otherwise as the bottlegourd skin was more brown than green.  Instead I used chopped bottlegourd.

I always like to prepare my chutneys using coconut oil.  It gives this nice aroma while sauteing and afterwards.  I was pleasantly surprised on how it turned out - my sister-in-law liked it.

Ingredients:

Half of bottle gourd medium sized
1 medium sized onion
1 tsp ginger garlic paste
2-3 green/red chilly - depending on your spicy taste bud
1 sprig of curry leaves
10 sprigs of coriander leaves - chopped coarsely
salt to taste
tamarind paste/juice - small pinch
1 -2 tbs of coconut oil - optional can use any other vegetable oil
1tsp cumin seeds
1 tsp of channa dhall
2-3 tbs of coconut gratings.


Preparation:
Some of the ingredients 

1. Removed the skin of the bottlegourd.  Chopped the vegetable to small pieces.  Since you are grinding into a paste, you need not remove the inner white portion and the seeds of the bottle gourd if they are not hard.

2  Heat coconut oil. Once hot, add in cumin seeds.  Let it splutter.  Afterward add in channa dhall and let it turn slightly brown.

3.  Next add in the onions and cook till soft and light in colour.  Add in ginger/garlic paste - stir till the rawness of the paste disappear.  Add in green chilly and curry leaves.  Fry for another minute or two so.

4.  Add in the the chopped bottle gourd. Mix well and let it cooked till soft.

5.  Add in the coriander leaves and cooked for a few more minutes.

6.  Remove from fire and leave it to cool.

7.  In a grinder, add in the cooled bottle gourd mixture, adding coconut scraps. salt and tamarind juice/paste.  Blend into a fine paste.

8.  Remove from the blender and serve with some chopped coriander leaves.


Thai Style Steamed Fish with Lemon Sauce

This is a late post - found this picture while clearing up space on the camera.  Made it about a month ago.

I used a white fish called Sherry. You can fry, make fish curry, fish balls, bbq and even steam. In any manner of cooking, the flesh is always soft and sweet.  You can use any good white flesh fish for steaming.

My steamer is a medium sized therefore I had to cut the head and leave it in the pan so as it gives extra flavouring while steaming. My whole family are not a fan of fish head and normally get the fishmonger to remove the head while cleaning.

I like to add some vegetables when steaming the fish so as I get 2 in 1 dish instead of preparing a separate dish.

Ingredients

1 whole fish - clean and gutted - sliced diagonally
1 tbs ginger garlic paste
1/2 cup of lemon juice  and lemon zest
2 tbs of fish sauce
2 tbs of light soy sauce
1tsp of brown sugar - optional
3-5 small green/red chilly -depending on your spice intake. slightly bruised
1-2 lemon grass - bruised light use the white end only
1 tbs chinese red dates - optional
1-2 kaffir lime leaves -otional
mixture of cauliflower/brocolli/carrots - optional
3-5 springs of coriander leaves
chopped spring onions


Preparation:

1.  Prepare your steaming pot.

2.  Cut 3-5 diagonal slashes across the fish depending on the size of the fish, about 2 inches apart on both sides of the fish.  This is to ensure that gravy/sauce gets coated well with the fish.

3.  In a pan ready to steam, rub ginger garlic paste on both sides of the fish. Sprinkle salt as well on both side of fish.  Under the fish place the bruised lemongrass.

4.  In a different bowl, add in lemon juice, lemon zest, brown sugar, soy sauce and fish sauce .  Adjust the seasoning if required.

5.  Pour lemon juice mixture over the fish together with chinese red dates, kaffir leaves and chilly.

6. Steam on medium heat, covered.  Add in the vegetables when the fish are about done.  Cover the steamer for another 5-8 mins till the vegetables are tender and cooked.

7.  Serve hot with coarsely chopped coriander leaves and finely chopped spring onions.

Enjoy Thai Styled Steamed Fish with Lemon Sauce with rice and some spicy vegetable.


** Sathiarani**


Friday, April 24, 2015

Almost White Vermicelli Rice Noodle @ Meehoon

I have always fried meehoon/beehoon aka vermicelli rice with some soy sauce and chilly paste rendering it almost red in colour.  This time around I decided to prepare it almost white with some soy sauce.  The addition of white pepper gives a slight dash of peppery taste on your tongue.


Almost White Vermicelli Rice Noodle aka Meehoon.

Ingredients
1 packet of 200gm vermicelli rice
1 whole bulb of garlic - pounded finely
1/2 half carrot - sliced thinly
2-3 pieces of lettuce - chopped coarsely
chicken breast cut into small pieces
1.5 tsp of white pepper
1 tsp of light soy sauce (salted)
1 whole spring onion - chopped finely
salt to taste
oil for saute

How to prepare

1.  In a bowl, marinate chicken strips with white pepper, soy sauce and salt to taste. Leave it aside to marinate about 15-20mins.

2.  In a pot, put in the vermicelli rice covered with cold water and put it to boil.  You will noticed that the noodles will turn into nice white colour when it is almost done.   Strain and keep aside.

To be sure feel it with your fingers, you will know it is cooked. You need not wait till the water starts to boil. This will only make the noodles very mushy when it cook it further.

3.   In a big deep wok, heat enough oil, add in whisked egg to make it scrambled eggs.  Set it aside.

4.  In the same wok, heat oil, once it is hot, saute in pounded garlic till nice aromatic.  Add in the marinated chicken and stir well.  Cook for a few more minutes and add it carrots and lettuce to the mixture. Keep stirring and cook it further.

5.  Add in the vermicelli and stir well till the sauces/chicken mixture are well coated with the vermicelli.

6.  When they are fully coated, add in the scrambled eggs and chopped spring onions and mix well.

7.  Ready to be serve.


Enjoy!!!

** Sathiarani **


Dhall Fry

Dhall fry is so simple to prepare that anyone can do it.  It is best eaten with rice or chapatis/rotis, naans.

Dhall fry best done with tuvar dhall (pigeon pea lentils).  You can also make them with either moong dhall, masoor dhall or chana dhall.  

Mine was a combo of moong dhall and tuvar dhall equal portion. I like to saute with ghee and a cooking ahead atleast an hour or more so as to let the spices absorb well with the dhall gravy.

You can use a pressure cooker or with a laid back fashion as I just did (but beware not to burnt them though)

Ingredients

1 cup of tuvar dhall
1 cup of moong dhall
enough water to pressure cook
1 tsp of turmeric powder

4 tbs of ghee
1 tsp of mustard seeds
1 tsp of cumin seeds
1 big onion - chopped
1 tsp ginger garlic
2 red chilies - chopped coarsely
2 sprigs of curry leaves
2 -3 dry chilly
a good dash of asofetida
1 tsp of turmeric powder
1 tsp of red chilly powder
1 medium sized tomato - chopped finely
salt to taste
3-4 tbs of chopped coriander leaves
water to adjust the thickness of dhall
1 tsp of lemon juice. - optional


How to prepare:
1.  Wash and pressure cooker both dhalls with turmeric powder till soft without any grains felt.  It should be kind of creamy and mushy.

2.  In a pan, heat ghee till melted.  Add in mustard seeds and let it splutter

3.  When the mustard seeds starts spluttering, add in onions, fry till soft and translucent, add in ginger garlic paste. Once the rawness of the ginger garlic is disappear, add in the chilies and curry leaves, stir well

4.  Add in the powders, stir and mixed well.

5.  Next goes in the chopped tomatoes, mix well and stir well and cooked till the tomatoes are soft and the oil is separated from the sides.

6.  At this point, season with salt, add in the cooked dhall, mixed well, beware though, the dhall is very thick and they will start to pop.

7.  Add in some water, depending on your required consistency, mixing well with the tempered and dhall.

8.  Once they are well coated, remove from fire, add in the chopped coriander leaves and lemon juice.  Stir well.

If you prefer, you may add in a dash of ghee and chopped coriander leaves while serving.

Enjoy.

Dhall Fry

Dhall Fry and Chapatis

Sathiarani


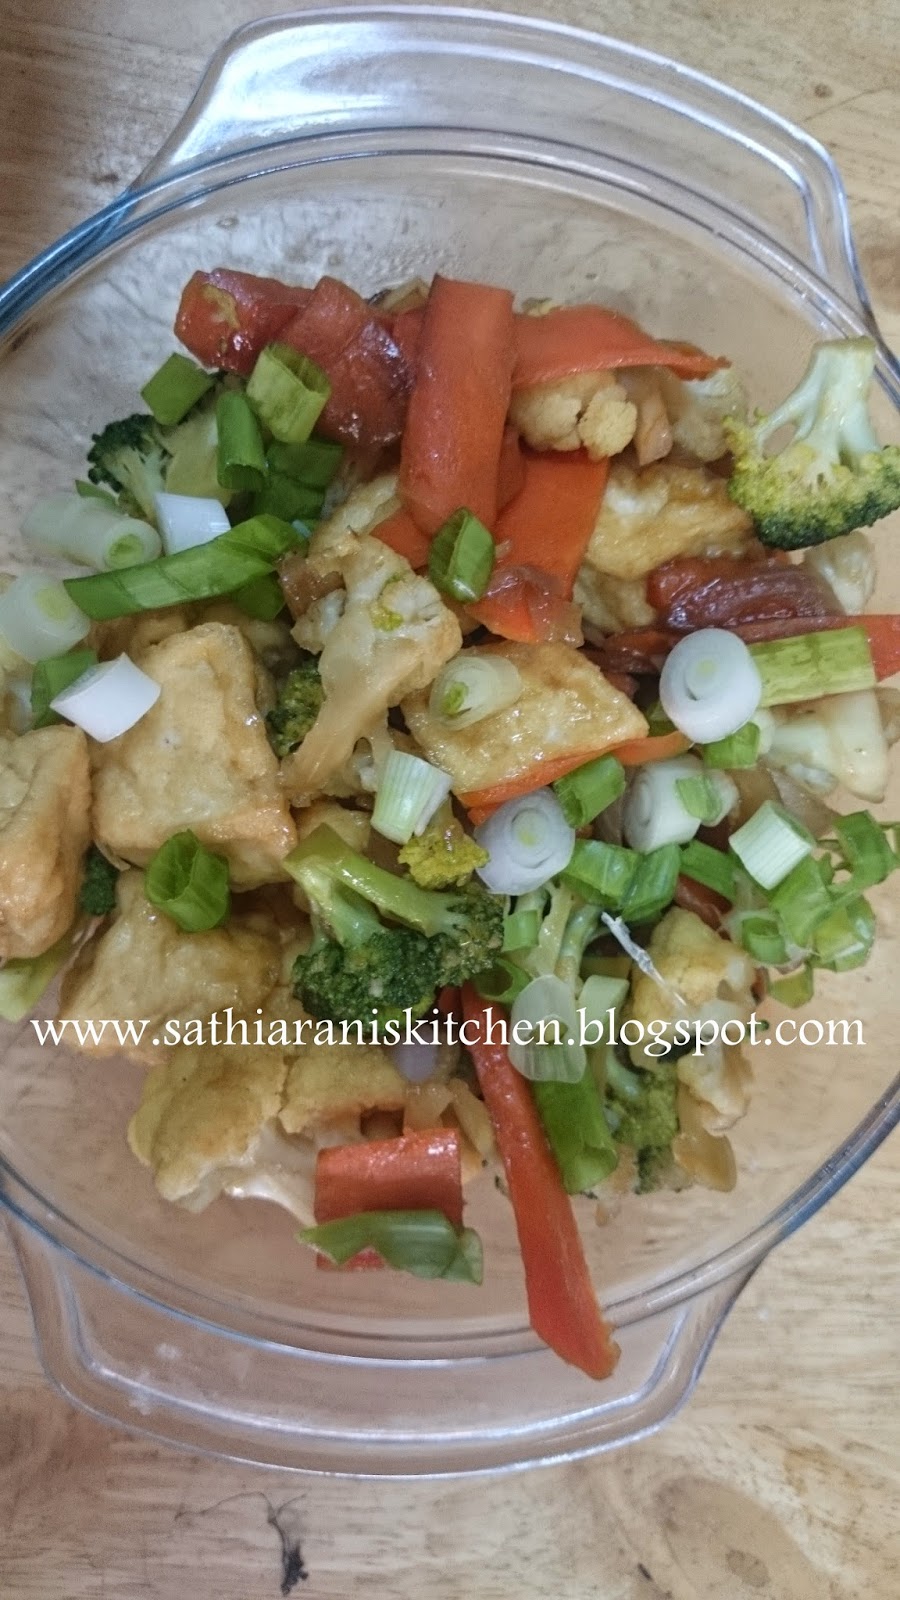
Mix Vegetables with Tofu

Some brocollis, carrots, cauliflowers and tofus you can make a great dish. No strict amount but a handful of this and that with some good seasoning and voila you get an easy peasy dish.

If you fancy meat/seafood, you may add them while sauteing onions/ginger garlic.

Ingredients

broccoli florets
cauliflower floerets
tofus - firm ones cut into square and deep fried
carrots - sliced diagonaly
Salted soya sauce
fish sauce
oyster sauce
slices of onions
ginger garlic paste
chopped spring onions
some water


Method

Wash and drain the vegetables.
In a pan heat some oil, once hot, stir in onion, once it is soft, add in ginger garlic paste and in stir.
Add in the vegetables, stir well, uncovered,  as to coat with the onions and ginger garlic paste.
In a different bowl, mix all the sauces with some water.
Once the vegetables are almost done, add in the sauces as well the tofu. mix well, let it simmer for a more minutes.
Add in chopped spring onions and serve hot with some steaming hot rice.

Enjoy

Sathiarani


Mutton Bone Rasam/Soup

Mutton Bone Rasam/Soup

My son recently had a hairline fractured on his left elbow.  Friends suggested making home made mutton bone soup for a speedy recovery. Apparently the juicy from the bones have healing properties for the bones.  I used a pressure cooker to stew my soup.

Lets look at how to prepare this soup.

Item A
1 tsp of peppercorn
2 tsp of coriander
1 tsp of white peppercorn
1 tsp cumin seeds
1 tsp fennel seeds
2-3 dried chillies depending on the spiciness required
a few sprigs of curry leave

Item B
1 small onion
thumb sized ginger
3-5 cloves of garlic

Item C
1 tomato - chopped small
2-3 chilly  chopped coarsely

Item D
150 gms of mutton bones with fats
6 cups of water
1/2 tsp of turmeric

Item E
1 tbs of gingely oil - optional

Item F
a handful of finely chopped coriander leaves

1.  Grind items A into fine powder and Items B into fine paste.
2.  In a pressure cooker/deep based pot put in all items except gingely oil and coriander leaves.  Cover the pressure cooker and let it on till 5 whistles.
3.  If not using a pressure cooker, stew/boil the soup for an hour or till the meat are well cooked.
4.  Add in gingely oil and chopped coriander leaves and leave it to simmer for another 10 mins.
5.  Ready to serve with bread or rice or just enjoy it as it is.

Enjoy

Sathiarani


Friday, April 3, 2015

Quick and Simple Bake Salmon

A recipe shared by my niece, Mirosha from US. I tried this version of marination for our dinner a few days ago.  I could not find any chipotle powder so I substituted with paprika powder.  I love the use of paprika powder for marinating sea foods and meats. 

For side dish I had some carrots, potatoes, capsicums and broccoli.  My potatoes was slightly under-cooked, should have boiled and let it bake together with the other veges.

Ingredients required

3 cuts of salmon
Orange Juice from 2 oranges
Teriyaki Sauce enough to glaze the salmon
Chipotle pepper powder - enough to cover the salmons.

Vegetables of your choice for side dish.
  
  • Thaw salmon, squeeze orange juice on it and let it sit for about half hour.
  • Glaze it with teriyaki sauce
  • sprinkle with chipotle pepper powde as per need
  • bake skin side down for 30 mins on 180C
  • broil on hi 5mins before removing and serve hot.

Enjoy

Sathiarani


Tuesday, January 27, 2015

Vendakai (Ladies Finger/Okra) with Mothchai "மொச்சை" (Lima Beans) Puli Kulambu

Vendakai (Ladies Finger/Okra) with Mothchai "மொச்சை" (Lima Beans) Puli Kulambu

I love mothchaikotai or mothchai ie lima beans.  My mum used to make curry with dried fish and motchai kind of thick and slightly spicy.  Just thinking of one can make me drooling.

Lets look at how I make this thick gray full of tangy, spicy and sort of thick gravy suitable for a cold winter with hot chapati or hot steaming rice.

Ingredients
10 ladies finger - medium sized - washed and sliced into 2 or 3
1/4 cup of lima beans - washed and soaked overnite or atleast 4hours  and boiled
1 medium sized tomato - chopped small.
1/2 tbs of
1 big onion - sliced
1 sprig of curry leaves
1/2 tsp of mustard seeds
1 tbs of fenugreek seeds
1 tbs tamarind paste mixed with 150ml water
2 tbs of chilly powder (I used the kashmiri chilly powder)
1 tbs sambar powder
1 tsp turmeric powder

How To Prepare
1.  Prepare the beans, ie wash and soaked overnite preferably otherwise about 4 hours will do, then either pressure cook it or boil soft with some salt.  Once done, drain and you can either remove the skin or leave it on.

2.  Next heat oil.  Once hot, add in mustard seeds.  Once it starts to pop/splutter, then add in the fenugreeks, stir fry, do not burn the fenugreeks or you will have bitter after taste.

3.  Add in onions and saute till soft, followed by the ginger garlic and tomatoes.  I like to crush my tomatoes with my hands sort of like puree. Mix well for 3-4 minutes.

4.  Add in all the powders, mix well with oil mixture, saute for a few more minutes, till the oil starts to split.

5.  Pour in the tamarind juice and mix well, season to taste.  Cover and let it boil for a few more minutes, add in the beans and let it reduce to a almost thick gravy.

6.  Once it is almost thick gravy add in the sliced ladies finger, mix well and let it simmer till the ladies fingers are tender and cook and require consistency.

Enjoy

Sathiarani


Tuesday, January 20, 2015

Tindly Fry (Kovakkai)கோவக்காய் Fry

Tindly, Ivy Gourd or it is called kovakkai in tamil (கோவக்காய்) is a kind of vegetable that you find in abundance in Qatar as it vegetables are mostly imported from India.  This is the second time only I have cooked, first being when my husband bought the vegetable out of curiosity.

To tell the truth, I am beginning to like them and I shall be trying more different style of cooking with this newly found love towards Tindly @ Kovakkai..

You can find out more about ivy gourd/tindly on this http://www.healthbenefitstimes.com/health-benefits-of-ivy-gourd/


These are matured kovakkai that do not want to cook.

Ingredients Required
350gm of kovakkai - wash and sliced thinly
1/2 tsp of mustard seeds
1/2 tsp of urad dhall
1/2 tsp of ginger garlic
1 sprig of curry leaves
1 big onion  - finnely chopped
1/2 tsp of tumeric powder
1 tbs of curry powder - I used kashmiri chilly powder for the extra spiciness.
  
How to prepare 
1.  heat oil and  once hot, add in mustard seeds, when it starts to splutter, add in urad and followed by onions
2.  Saute the onions till soft.
3.  Add in ginger garlic and curry powder stir.
4.  Add in curry powder and turmeric and stir in  for seconds,
5.  Stir in the sliced kovakkai, mix well and and add in 2 -3 spoons of water and stir well.
6.  Season with salt and cook till tender.
7.  Ready to be serve with chapatis and rice.


Enjoy!!!

Sathiarani


LinkWithin

Related Posts Plugin for WordPress, Blogger...

Quick and Easy Vegetable Briyani

Quick and Easy Vegetable Pulao with Pomegranate Raita 2nd Friday Aadhi Velli Menu of the day Naivedyam was Arisi Paruppu Payasam @ Rice ...